An Introduction to Tiny Clothesmaking
I've been making clothes for tiny avatars in Second Life (tinies) for about 14 months now, and everytime I start a new outfit I still learn something new... and for every outfit I put out in my store I've got another 10 or so versions that I've chucked out of frustration. It's definitely not the easiest of things to do!
As many tinies have asked about clothes building lately, and as I feel I am finally in a spot where perhaps I have more suggestions to offer than questions to ask, I thought I would post a simple introduction to clothes for tinies.
So how do you start making clothes for tinies? In some ways it's completely different from humanoid (biggie) clothes, but in other ways it's really similar. Most of the clothing for humanoids is
created in a graphics program and then imported in as a texture. Prims (primitive shapes) can be added to it, but the base of the outfit is made of textures applied to the built-in clothing options (i.e., in appearance mode > create new socks).
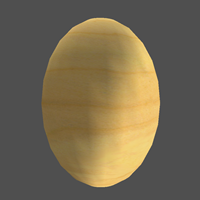
One of the designers I admire has said several times that every time she starts a new tiny outfit it begins with an egg.
Tiny clothing needs to fit around prim bodies. You can't use the built-in clothes templates that SL has. Instead of starting with textures, clothes for tinies always start with prims.
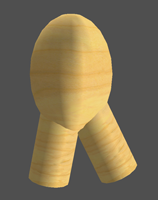
If you think about it, a sphere elongated a bit, and a couple of cylinders gets you pretty far. True it's kinda chunky and the plywood look is soooo 2004, but you can at least see the potential.
To really make this chunky-clunky start into an awesome outfit, prims will need to be manipulated, textures applied and once it is all done it will need to be set up to attach to a tiny's body.
It takes time to hone your tiny clothesmaking skills but if you are passionate about learning you can do it!
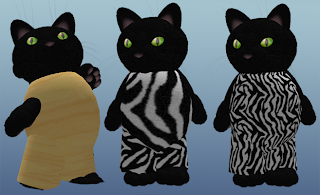 Applying a texture ("Fabric - Zebra Skin" from the default SL Library) improves the look of the outfit. Further adjustments to the texture (changing the Repeats Per Face under the Texture tab of the Build Palette Window) makes the outfit look even better!
Since this is a texture from the default inventory library it's not original, but it looks better than the plywood for now. Uploading my own original texture will make this outfit more unique.
First, a word of caution
Applying a texture ("Fabric - Zebra Skin" from the default SL Library) improves the look of the outfit. Further adjustments to the texture (changing the Repeats Per Face under the Texture tab of the Build Palette Window) makes the outfit look even better!
Since this is a texture from the default inventory library it's not original, but it looks better than the plywood for now. Uploading my own original texture will make this outfit more unique.
First, a word of caution: Clothing making for tinies is
NOT a lucrative business. If you want to learn to make clothes because you want to open a shop and have dreams of rolling in Lindens, you should instead investigate humanoid (biggie) clothing making. Many of the most talented artisans I know in Raglan either don't make enough to pay rent on their shops each month, or they make *just* enough to squeak by. To pay store rent fees, many artisans supplement sales by entering contests, working in SL at places or events, or other creative means (not everyone has a credit card and disposable income to spend on buying Lindens!).
My formula for making tiny clothing and accessories:
patience,
creativity, and
details!
Patience
This is not something that most tinies learn in a day. Or a week. Or even a month. There are a lot of things to consider, and it takes time to get prims and textures to behave the way you think they ought to.
To reduce your frustration level:
- Start small. The first tiny clothing item I made was a sleeveless t-shirt. Once I got that down, I moved on to t-shirts with sleeves. If you start too big or detailed you may get frustrated when things aren't working out the way you would like. Smaller projects that you can conquer build confidence and help you understand how more complex projects could be created.
- Be willing to work on something for several weeks if need be. Some outfits or items just take time to get "right".
- If something is just not working, try taking it back into your inventory and starting a different project. Time away from something might give you new insight when you bring it back out again.
- Find some alpha and beta testing buddies. I am really fortunate that some fellow artisan friends are willing to be test subjects for the things I make. They try stuff out as if they had really bought it - meaning they wear it, fuss with the menus, resize it if necessary, etc. Then they IM me to tell me all the things that aren't working. I can't even begin to list how many things I've made had to go through several revisions before they were ready to give out or sell. (And some things never made it out of beta!)
- Name your in-progress work. After awhile it gets really hard to find something if it is named Object and you have 2,500 other Objects in your inventory.
- Version your projects. Start something then take a copy into your inventory and give it a number. Like, polkadance-shirt-v1. Then work on it some more and take another copy into your inventory. Rename that one polkadance-shirt-v1.2. If you version your projects like this, you can always "roll back" to an earlier version if you suddenly modify it in a way you don't like. This will also be extremely helpful if for some reason SL crashes or glitches. Occasionally you can lose an hour or more's work if you build something without taking copies (there is a technical explanation of why you might lose updates/work on attached items in the forums if you'd like to read about it).
- Keep your work organized in folders. Your inventory can become insanely overloaded if you don't!

Creativity
One of the coolest things about Raglan in general is that you can find things that you can't really see elsewhere on the grid. After you get a couple of simple projects under your belt, and when you begin to brainstorm about what to make next, try to think of something you haven't seen around the Shires.
This isn't as easy as it sounds - as my friend Karma says, "Tiny Minds Think Alike". So if you start working on a rocket-powered-magic-toast-with-jam-sled with polka-dot-plush-seats and then you happen to see that someone else has already made that, don't feel too bad - sometimes tinies are psychic and they build very similar things. However, you want to be
really careful that you don't go into someone's shop and see what they have, then make the same thing. That's considered bad form!
If you get stuck on trying to come up with original ideas, try:
- Be as silly as possible. Fill in the blanks: if only you had _____, you could _______. Then try to scale your ideas into something you could actually make. For example, if only I had one million marshmallows and 2 vats of chocolate, I could have the most amazingly yummy napping spot. Well, maybe I could make a graham cracker bed, with a marshmallow comforter and a chocolate pillow? Prim-wise that would be fairly simple. I would just need some sweet textures to make it look as tasty as it sounds!
- Do some RL artwork. Paint, draw, sculpt with playdoh or clay. While you are creating your RL artwork, think about your tiny SL self. Inspiration may hit you!
- Fill in the blank: __________ would make life 300x better. Think big, then scale it down to something you could actually build. For example, A flying broom that auto-guided so I could read a book at the same time as it flew me around would make life 300 times better! I actually did make a scaled down simpler version of this - it's in one of my lucky boards.
- Play in the Shire with some tinies. They are inspirational!
Details
This is where you really turn an egg into a work of art.
Manipulating prims,
creating textures, and
scripting are some of the basic skills you will want to work on.
- Manipulate Prims: Being able to change the parameters of a prim to turn it from a cylinder into a bell-bottomed leg of a pair of pants, or to take a sphere and alter it into a tube top, or torture a torus until it looks like a wisp of hair takes practice and experimentation. Attend classes at Raglan U to learn about prim manipulation in general, check out some online resources and tutorials, and play around with prims.
- Sculpties are prims with a special texture applied. They allow you to make more organic and complicated shapes, but they also have a higher learning curve if they aren't pre-built. Full perm sculptie textures to use in your builds can be found for purchase, or you can make sculpties in-world (using tools like Sculpt Studio or the free and open source Open Loft), or in an external 3D application (there are plenty of free options).
- Create Textures: You can buy full perm textures or get them from Midnight Mania boards or hunts, but at some point you will probably want to get into a graphics program (like Photoshop or the free GIMP graphics program). Adding your own personal graphic touches to an outfit can really make it fabulous. Be careful that if you are using non-original textures that you have the rights to do so - especially if you want to eventually sell your work! And yes there is a cost to building your own projects. Each texture upload is currently 10L. This can really add up if you are testing out textures. Two options for the Linden-conservative tiny: Use the Emerald Viewer to temporarily upload a texture (it doesn't last long, but you can apply a texture to a prim and see how it looks before spending the actual Linden in a permanent upload), or use the BETA grid to try out textures. The BETA grid isn't permanent either, and you need to re-upload and create your work on the live grid, but it is an option to save some L when you are first starting out, or if you don't want to use an alternative viewer like Emerald.
- Script: Depending on what you make, you might want to add scripting to give it that extra kick. Unless programmatically inclined, though, it seems like most folks learn by first working on basic prim manipulation, then moving to textures, and then up to scripting.
Attachment Points
There are lots of opinions about where to attach your prims, but here are two things to keep in mind:
- Most hair is attached to the skull. If you are making a hat, consider attaching it to another point so it doesn't replace someone's hair. For the first 8 months I created hats that all attached to the skull - until a kind possum pointed out that my hats kept replacing her hair. As a cat often sporting wild hair, you would have thought this would have occurred to me much earlier in my hat-making career! Now I make hair that attaches to the skull, and hats that attach to the chin. This isn't perfect, though, as many tinies have tongues or other items that attach to the chin.
- A lot of vehicles actually use the pelvis attach point. If you have clothes attaching to that point also, they will be replaced by the ride. This can leave a tiny pant-less!
One Size Does Not Fit All
Even among one type of tiny (Wynx's tinies for example) there is variation in the size of bodies, arms, heads, and legs. It is really difficult to make one outfit to fit all tinies unless you use some type of scripting (Azelle sells a nifty system for builders called AnyTiny that allows you to do just that!).
If you are just making things for yourself you don't really need to worry too much about this - as long as your outfits fit you that's all that matters. If you want to make something for a friend or to give or sell away, then you will need to think about how to make sure the outfit can fit the wide range of tiny bodies.
Perhaps the easiest option is to make your work MOD so that others can modify the outfit or accessory to fit their particular tiny shape (
knowing how to change permissions is extremely important!). Other options include making different versions for each tiny type, or using a scripting solution as mentioned above.
Resources
So how do you get better at
prims,
textures, and
scripting? Here are some online and in-world resources to help you get started!
Links with a (SLURL) at the end indicate an in-world link. All other links are to online resources.
Raglan University
- Calendar of events (see when classes are being held)
- Raglan U Portal -you can also buy older class notes/supplies here too! (SLURL)
Raglan Silica Cubicle
Informally known as the "Silly Cube", Raglan's Silica Cubicle is a great place to build. (
SLURL)
Prims
Sculpties
Textures
Scripting